X-Windows Remote Access to BNL with NX
This document based on http://request.nsls.bnl.gov/freenx/
Yury Gorbunov
22 February 2008
Comments? gorbunov[attt]rcf_d_rhic_d_bnl_d_gov
X-Windows Remote Access to BNL with NX
This note is about how to use NX technology to gain remote access with full X-Windows support. Typically, one can use the nxclient to connect to the office/beamline Linux box (nxserver), with full X-Windows functionality (to access the BNL intranet, etc., almost like you are sitting infront of the remote BNL computer). The key advantage of using NX, as compared to others (for example, "ssh -X -C"), is that NX uses very efficient compression to achieve very fast response while using very low bandwidth. In my experience, while connecting to my office Linux box, with a cable modem connection, there is no noticeable delay at all, and the bandwidth usage is about or below 10KB/sec most of the time, while doing web browsing on the remote desktop with Firefox. It's reported one could do this through a modem line.
Like most of the network applications, NX comprises of a Client and a Server. I already set up NX servers for many of the nsls beamline Linux computers. To connect to the nxserver, the only thing you'll need is to download a free (as in beer) client (Linux/Windows/Mac/Solaris) and follow the following procedures to configure it. For outside BNL network (at home), there is a special procedure to configure port-forwarding on PuTTY (Windows) or run a special "ssh" command (Linux), to go through the BNL SSH gateway.
NX technology was developed at NoMachine ( www.nomachine.com ), who licensed the core technology (the core library) under GPL. The community effort (free version) of NX is the FreeNX. We use the NoMachine client (free download), and the FreeNX server. FreeNX client is command-line driven, it's not as easy to use at the moment.
Client installation
Go to the www.nomachine.com and download appropriate version of the client.
Also one can download the 1.5 versions of clients (a snapshot from Jan 06) here locally. (Accessible only inside BNL)
Or I have a local copy of the clients on sc5.starp.bnl.gov
Linux client
sysuser@sc5.starp.bnl.gov:/home/sysuser/Gorbunov/arch/nxclient-1.5.0-141.i386.tar.gz
Windows Client
sysuser@sc5.starp.bnl.gov:/home/sysuser/Gorbunov/arch/Windows/nxclient-1.5.0-138.exe
plus fonts
rpms
Mandrake
/home/sysuser/Gorbunov/arch/rpm_mandrake/nxclient-1.5.0-141.i386.rpm
redhat
/home/sysuser/Gorbunov/arch/nxclient-1.5.0-141.i386.rpm
and two files for debian
/home/sysuser/Gorbunov/arch/deb_sarge/nxclient_1.5.0-141_i386.deb
/home/sysuser/Gorbunov/arch/deb_woody/nxclient_1.5.0-141_i386.deb
I guess you know what to do with rpm files and deb files but I have to explain what to do with *.tar.gz
cd /usr
tar -xzvf /where/you/have/nxclient-1.5.0-141.i386.tar.gz
so you ready to start it!
First thing to do is to establish port forwarding
Normally we have to go through the BNL ssh gateway (rssh.rhic.bnl.gov) to gain access to BNL computers, in a two step process, first ssh to rssh.rhic.bnl.gov, then from there "ssh BNL_host". To make nxclient connect directly to the Linux server inside BNL firewall with SSH, we'll need to take advantage of the SSH port forwarding feature.
For Linux, this is just a ssh command,
this is not exactly true any more
ssh -L 7777:sc5.starp.bnl.gov:22 your_username@rssh.rhic.bnl.gov
please use the set bellow
since stargw has been added please use the following commands, and if I will find something more simple I will update the page
ssh -L 7777:localhost:7777 user_name@rssh.rhic.bnl.gov -A
ssh -L 7777:localhost:7777 user_name@stargw.starp.bnl.gov -A
ssh -L 7777:localhost:22 user_name@sc5.starp.bnl.gov
Login to rssh.rhic.bnl.gov with the command above (don't forget to put a real user name) and leave the command window open.
There is also a solution for windows. It's a bit convoluted way to do it but so far I don't have anyhting more elegant.
First you should have pageant.exe running which should have you ssh key uploaded.
As the next step go to the startup menu -> click run - > in the menu type cmd , The window should appear in which one you should type :
putty.exe -L 7777:localhost:7777 user_name@rssh.rhic.bnl.gov -A
as a result a standrad putty terminal window will appear in this window type:
ssh -L 7777:localhost:7777 user_name@stargw.starp.bnl.gov -A
ssh -L 7777:localhost:22 user_name@sc5.starp.bnl.gov
and than start nx for windows as usual .
I will update this page if I will find a better solution
Client Configuration
Start nx client with the command /usr/NX/bin/nxclient
the window below will appear on the screen

Picture 1
Login Screen
Specify the username : sysuser
Password for the sc5.starp.bnl.gov
Name the seession : whatever you like
Now it's time to configure the NXClient. Click "Configure" on the NXclient logon scree, you'll get the configuration screen, as shown below.
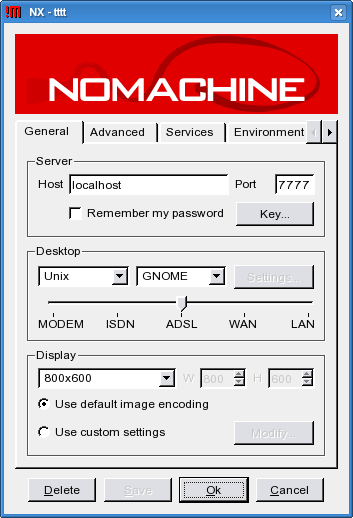
Picture 2
Configuration Screen
Now specify host name : localhost
port 7777
Desktop Unix and X window manager GNOME
Display
I used 800x600 , but screen is a bit too small I think .. there are several options available an you can try them to see what fits you best.
Now we have to configure public key!
download one from sc5.starp.bnl.gov
sc5.starp.bnl.gov:/home/sysuser/Gorbunov/arch/client.id_dsa.key to you computer
or on sc5 at /etc/nxserver/client.id_dsa.key
Clcik “Key” button in the configuration screen
The screen below will appear
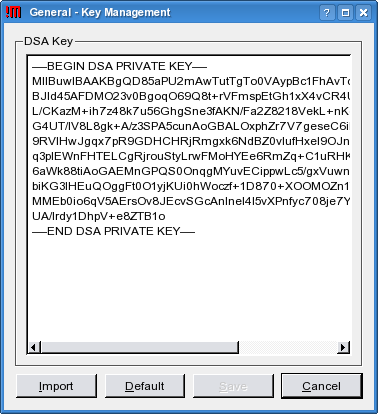
Picture 3
Public Key Specification Screen
Click “Import” navigate to where you stored the public key and select the file, click “ok”
then click “Save”
You will get back to the configure menu, click “Save” and “Ok” and then click “Login” on the login menu
After few seconds a new screen appear as shown below :
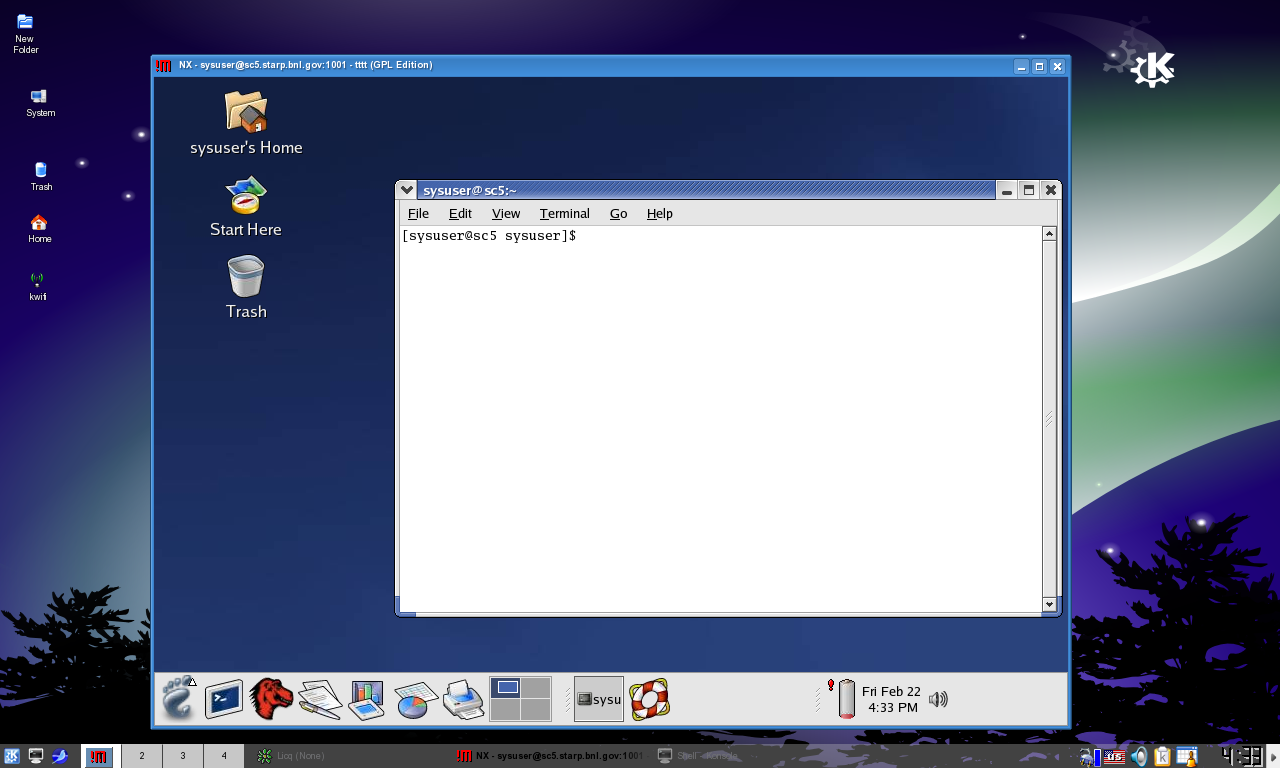
We need a putty client and Xwindows server (Exceed or similar)
First click on the PuTTY icon, to configure it. Host Name =rssh.rhic.bnl.gov. port 22. As shown.
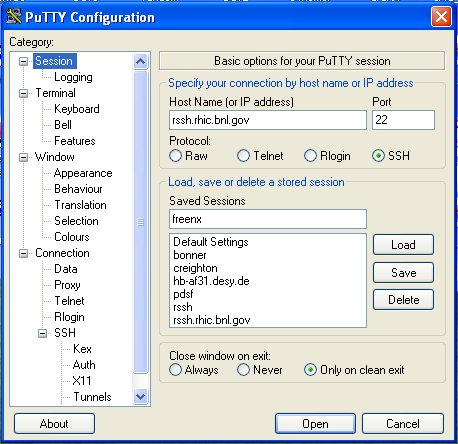 \
\
Next click on SSH -> X11 button on the left, Enable X11 forwarding, to localhost:0
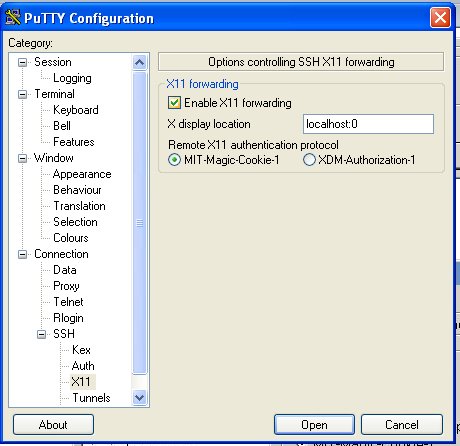
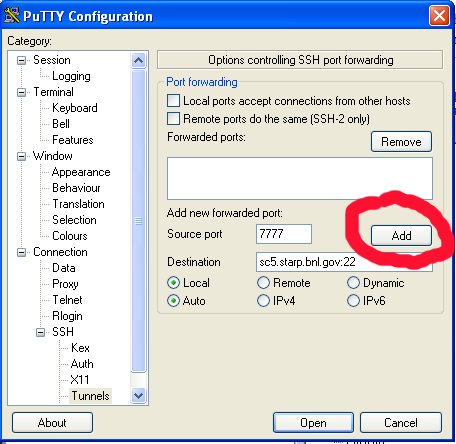
Now click on Tunnels, fill in Source port the LocalPortNumber you chose (7777 in this example, this should be the same number that you input in the nxclient configure screen). Click on Add. Go back to the session tab to save the session, so that you don't have to go through all this configuring again every time you use it. Login to your rssh.rhic.bnl.gov account with your userid and passwd. Leave the PuTTY window open.
- Printer-friendly version
- Login or register to post comments
